Springfold Paper/All plans/Paper flowers/2026-08
An Eighteen-Petal Camellia That Keeps Its Shape
Three concentric rings — 7, 6 and 5 petals — each rotated 9° against the one below, so no cut edge ever stacks on another. The head is mounted on a rolled paper stem instead of wire so the finished flower survives being posted.
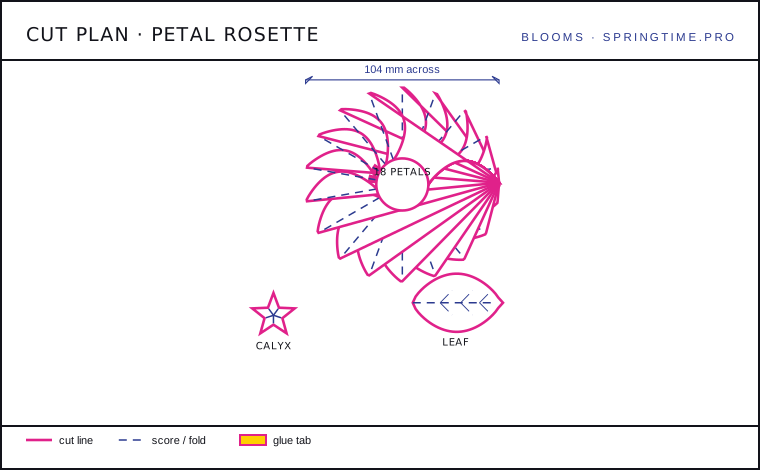
Score the spines before the scissors come out
Every petal in this bloom folds along its own centre line. If you cut first and fold afterwards, the card fibres are already broken at the edges and the petal will crease where it feels like it rather than where you intended. Run the bone folder from the base to 4 mm short of the tip on all 18 petals while the sheet is still one flat piece.
A flat sheet also gives you a straight reference edge. Push the sheet against the mat grid, drag the folder once per petal, and you will feel the paper soften under the tool on the second pass. That softening is the score working — do not press harder to get it sooner.

Cut the rosette in one continuous line
Work anticlockwise around the rosette with detail scissors, turning the paper rather than the blade. Long continuous strokes leave a clean edge; short correcting snips leave a fringe that shows the moment the petals are curled. Between petals, cut the separation slit straight in to the 14 mm disc — overshoot by 1 mm and the base tears, undershoot and the petals will not sit flat.
Cut the calyx star and the single leaf in the same session so the offcuts stay together. Offcut identity matters more than it sounds: 120 gsm card has a grain direction, and a leaf cut cross-grain will droop within a day while the petals stay upright.
Curl with the ball tool, not with your thumb
Place each petal face down on the mat and draw the 8 mm ball from the base outwards, twice. The curve you get is gentle and even. Thumb-curling gives a sharper crease at the point where your nail lands and a flat spot on either side of it, which is exactly what makes a paper camellia read as paper.
Work in ring order and check as you go: the outer ring wants about a quarter of a cylinder, the middle ring half, and the five inner petals almost a closed tube. If the outer petals curl as tightly as the inner ones the flower closes into a bud instead of opening.
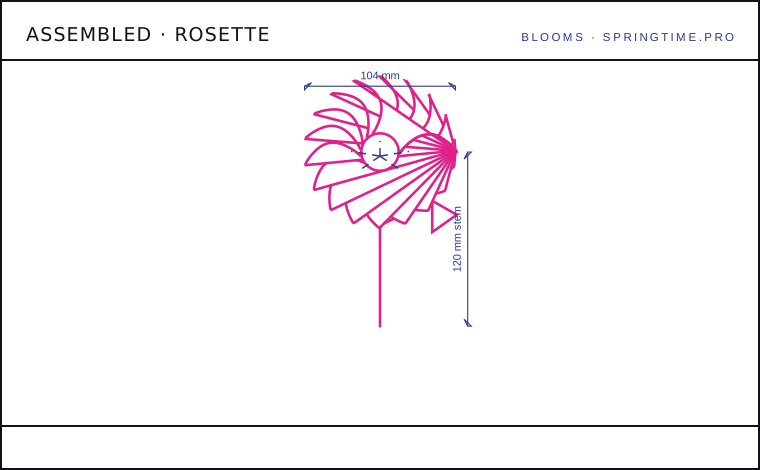
Assemble from the outside in, and glue the disc last
Roll the 90 × 210 mm rectangle around the two wire lengths on the diagonal to make the stem, glue the last 20 mm, and let it sit for ten minutes while you stack the rings. Place ring one face down, glue ring two at the centre only — a 20 mm bead, not a ring of adhesive — rotate it 9°, and press for a slow count of five.
Ring three goes on the same way, then the calyx, then the disc, which hides all three glue beads at once. Because the rings are glued only at the centre, each one stays free to flex at the rim, and the head springs back after a knock rather than denting permanently.
Specification
| Petals | 18 in three rings (7 / 6 / 5) |
|---|---|
| Ring offset | 9° between rings, 20° within a ring |
| Head | 104 mm across, 46 mm deep |
| Card | 120 gsm body, 26 gsm crepe inner ring |
| Working time | 95 minutes, of which 40 is drying |
| Blank size | 144 x 144 mm |
| Pieces | 20 |
| Assembled | 104 mm head on a 120 mm stem |
Shape parameters
These are the numbers the cutting plan is generated from — change one and the net is redrawn around it, so the drawing and the figures can never disagree.
| Petals | 18 |
|---|---|
| Petal length | 38 mm |
| Petal width | 13 mm |
| Petal curvature | 0.46 (0–1) |
| Disc radius | 14 mm |
| Calyx points | 5 |
| Calyx radius | 12 mm |
| Leaf length | 46 mm |
| Glue tab | 4 mm |
| Stem length | 120 mm |
Fold order
| Line | Kind | Angle |
|---|---|---|
| Petal spine, valley, whole length | valley | 180° |
| Calyx arms, mountain, 90° from the disc | mountain | 90° |
| Leaf spine, valley, stopping 4 mm short of the tip | valley | 170° |
| Base disc rim, valley, all the way round | valley | 120° |
Cut list
- Outer rosette contour, 18 petals in one pass
- Petal separation slits down to the 14 mm disc
- Five-point calyx star
- One leaf, 46 mm, with a 6 mm stem tail
Check the plan against the object
What goes wrong
- Cutting the petal slits with a craft knife and a ruler — the blade lifts the card at the disc and the base delaminates.
- Curling all three rings to the same tightness. A camellia only reads as a camellia if the outer petals stay almost flat.
- Gluing the rings edge to edge. The bloom then cannot flex and a single knock folds a petal for good.
Keep it clean
- Stand it out of direct sun. 120 gsm card yellows along the cut edges within about six weeks on a south-facing sill.
- Dust with a soft brush held at 45°, never a cloth — a cloth catches the petal tips and curls them again.
- Store flat in a lidded box with the head resting on tissue, not on its petals.
Also in this section
- A Double-Ring Tissue Peony in Under an Hour — 2026-08-25 · 55 min
- Paper Eucalyptus Spray for Filler and Foliage — 2026-09-12 · 40 min
- Quilled French Marigold: 18 Petals From One Sheet — 2026-09-20 · 70 min